Call flows are like a roadmap for what happens when someone calls your phone number. They help you decide how to manage incoming calls, ensuring they go to the right person or group. This guide will explain what call flows are and how to use different steps within them to manage your calls easily and effectively.
The call flow builder is an advanced feature best suited for Admins.
In this article, we’ll cover:
Steps
A step in a call flow represents an action or decision point in managing a call. Here are the available steps you can use in your call flows:
 .
. 
- Incoming call:
- The starting point of your call flow.
- Ring users:
- By default, this step will ring the users assigned to the phone number running the call flow.

- Alternatively, you can select a specific user or groups of users.

- The default ring time is 30 seconds.Note that the minimum ring time is 15 seconds. The reason for this is because any shorter than this and it will result in unanswered calls, particularly on mobile where connections can take a bit longer to initiate. Our recommended minimum is 20 seconds.
- To skip users currently on a call and direct the call to the next available user or path, you can check the Skip in-call users option.
- By default, this step will ring the users assigned to the phone number running the call flow.
- Queue:
- Callers will hear hold music, or audio files you upload, until someone answers. If no users are checked in to the queue the call will immediately flow to the next step. Here's more information on call queues.
- Play audio:
- You can upload an audio file, and have it play for callers. Once the audio file finishes playing the call flow will continue to the next step.
- Play audio is often used to add a welcome message before a Ring users step. For example if you call someone on our team you might hear "Welcome to VXT, calls are recorded for note taking purposes.".
- Schedule:
- Use this action to manage calls during business hours or after hours. It helps you control when calls are routed based on the time of day. Here’s more information on using the schedule.
- Dates:
- This action allows you to set specific dates for call routing. If a caller calls on a date you've set, it will follow the path you've configured for that date. Here's more information on using dates.
- Call menu:
- Also known as an auto-attendant, this action lets callers press a key on their phone to choose an option. If they don’t make a choice in time, it will follow a "timed out" path. Here's more information on using call menu
- Divert:
- This action sends the incoming call to another number and ends the call flow there.
- Send to voicemail:
- This will send the incoming call directly to voicemail. You can specify which user’s voicemail to use.
- If Enable Greeting is unchecked, no voicemail greeting will play and caller will instead hear a beep before the voicemail starts recording. This is useful if the previous step in your call flow is to play an audio clip.
- Hang up:
- As the name suggests, this will end the call.
Advanced steps
If you want to do more with your call flows, here are some advanced options:
- Caller ID:
- This lets you route calls based on the caller's phone number. You can choose to match exact numbers or parts of numbers.
- Webhook:
- This sends a request to a specific web address when this action is reached.
- This collects digits pressed on the keypad and sends them to a webhook. Callers play a sound and enter digits, ending with # or resetting with *.Keypad to webhook.
Connectors
Lets you connect one step to the next or drop in extra steps wherever you need them.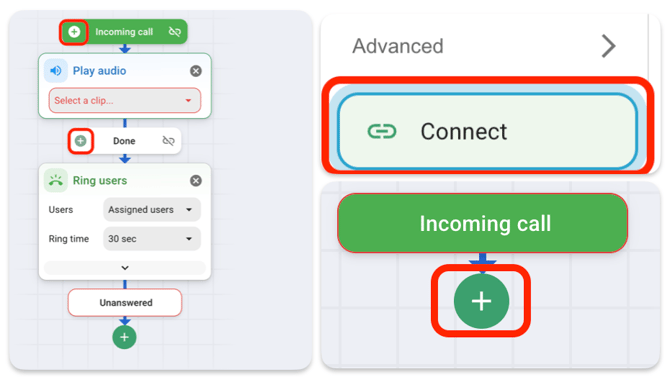
Call flow Selector
We wrote an article on the call flow selector to teach you how to change the call flow through the phone number on your account.

The call flow builder
To get started:
- Look for the admin button at the bottom left corner of your screen.

- Then, in the admin tab, find the call flow builder. This is where you can see all the call flows your company has created so far.

- If you want to create a new call flow, just click on the + new call flow button at the top right corner of the screen.

Call flow examples
Here are examples of call flows that might suit your business workflow:

-
A phone call comes in
 :
:-
Inside hours (9:00 AM to 5:00 PM)
- Ring all of the users assigned to the phone number(s) for 30 seconds.
- If none of the users answer, the phone call is sent to voicemail.
- Ring all of the users assigned to the phone number(s) for 30 seconds.
-
Outside hours (5:00 PM to 9:00 AM)
- All phone calls are sent to voicemail.
-
Guide to create this flow:
- Click the + icon under Incoming Call.

- Choose the Schedule step.

- Hit Configure and set your office hours.


- For Inside hours:
- Click the + icon and choose Ring users

- Hit the + icon again and select Send to Voicemail

- Click the + icon and choose Ring users
- For Outside hours:
- Click the + icon and choose Connect.

- Select the Send to Voicemail step under Ring Users. That way, callers will reach the same voicemail you use during inside hours.

- Click the + icon and choose Connect.
Remember to name your call flow and hit save!
Divert calls to answering services

-
A phone call comes in
:-
Inside hours (9:00 AM to 5:00 PM)
- Ring the receptionists group for 20 seconds.
- If no one answers, it redirects to Cherry and Clea for 20 seconds.
- If still unanswered, the call diverts to the answering service.
- Outside hours (5:00 PM to 9:00 AM)
-
-
-
- An out-of-office audio plays
- All calls are then directed straight to the answering service.
-
Guide to create this flow:
- Click the + icon under Incoming Call.

- Choose the Schedule step.

- Hit Configure and set your office hours.

- Under Outside hours:
- Click the + icon and select the play audio step.

- Choose your out-of-office audio or add a new one.

- Click the + icon again and select the divert step.

- Enter your answering service's phone number.

- Click the + icon and select the play audio step.
- Under Inside hours:
- Click the + icon and select the Ring Users step.

- Choose the group or users who should get the call first — here, that’s the Receptionists group. Here's how to add users to a group.

- Choose the group or users who should get the call first — here, that’s the Receptionists group. Here's how to add users to a group.
- Click the + icon again to add another Ring Users step.

- Select who should get the call next if Reception doesn’t answer — in this case, Cherry and Clea.

- Select who should get the call next if Reception doesn’t answer — in this case, Cherry and Clea.
- Set the call ring time to 20 seconds.

- Hit the + icon and choose connect

- Select the divert step under outside hours.

- Select the divert step under outside hours.
- Click the + icon and select the Ring Users step.
Remember to name your call flow and hit save!
Holiday-ready call flow
-
A phone call comes in
:-
Christmas Holiday:
- Play Holiday greeting audio
- Phone call sent to voicemail
- All other dates:
-
Inside hours (9:00 AM to 5:00 PM)
- Ring all of the users assigned to the phone number(s) for 30 seconds.
- If none of the users answer, the phone call is sent to voicemail.
- Outside hours (5:00 PM to 9:00 AM)
- All phone calls are sent to voicemail.
-
-

Guide to create this flow:
- Click the + icon under Incoming Call.

- Add the Date step.

- Click Configure and pick the dates you want in this flow.

- For long vacations or holidays, click New Group to create a new date group.

- Add the specific date(s) for office closure by clicking Add Date.

- Give the date group a name — for example, Christmas Holiday.

- Make sure it’s checked and click Save.

- For long vacations or holidays, click New Group to create a new date group.
- Under Christmas holiday:
- Click the + icon and select Play audio.

- Select your holiday greeting or upload a new audio file.
- Click the + icon again and add Send to Voicemail.

- Click the + icon and select Play audio.
- Under all other dates:
- Select the Schedule step.

- Hit Configure and set your office hours.

- For Inside hours:
- Click the + icon and choose Ring users

- Hit the + icon again and select Send to Voicemail

- Click the + icon and choose Ring users
- For Outside hours:
- Click the + icon and choose Connect.

- Select the Send to Voicemail action under Ring Users. That way, callers will reach the same voicemail you use during inside hours.

- Click the + icon and choose Connect.
- Select the Schedule step.
Remember to name your call flow and hit save!
For more tips on getting your call flow holiday-ready, check out our separate blog post.
Standard call menu call flow
-
A phone call comes in
:-
Inside hours (9:00 AM to 5:00 PM)
- A call menu audio plays.
- Press 1:
- the call goes to Cherry and rings for 30 seconds.
- If unanswered, it’s sent to voicemail.
- Press 2:
- the call goes to Clea and rings for 30 seconds.
- If unanswered, it’s sent to voicemail.
- Press 3:
- the call goes to Justine and rings for 30 seconds.
- If unanswered, it’s sent to voicemail.
- Press 1:
- A call menu audio plays.
- Outside hours (5:00 PM to 9:00 AM)
-
-
-
- An out-of-office message plays
- All calls are then directed straight to voicemail
-

Guide to create this flow:
- Click the + icon under Incoming Call.
- Choose the Schedule step.
- Hit Configure and set your office hours.
- Under Outside hours:
- Click the + icon and select the play audio step.
- Choose your out-of-office audio or add a new one.
- Click the + icon again and select the Send to voicemail step.

- Click the + icon and select the play audio step.
- Under Inside hours:
- Click the + icon and select call menu.

- Pick your call menu audio or add a new one. Here, it's the Welcome message.

- Click Add Path and choose the number the caller will press.

- Under 'Pressed 1':
- Add a Ring Users step.
- Select the user or group to receive the call — in this case, Cherry.
- Optional: Use the arrow to view more options

- Enable skip in-call users if you want users to be skipped when they’re already on a call.

- Add a call label, so you'd know which line the calls are coming from.

- Enable skip in-call users if you want users to be skipped when they’re already on a call.
- Select the user or group to receive the call — in this case, Cherry.
- Click the + icon again and add Send to Voicemail.
- Add a Ring Users step.
- Under 'Pressed 1':
- Repeat step c for the other number options (e.g., 2 and 3), updating the user under Ring Users each time.
- Click the + icon and select call menu.
Remember to name your call flow and hit save!